Skill Level Beginner friendly Short Description
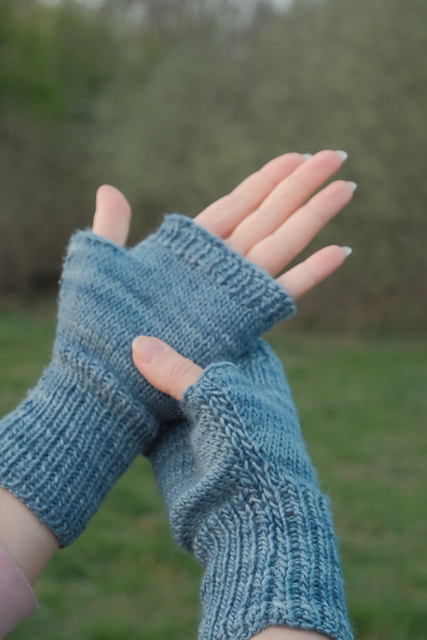
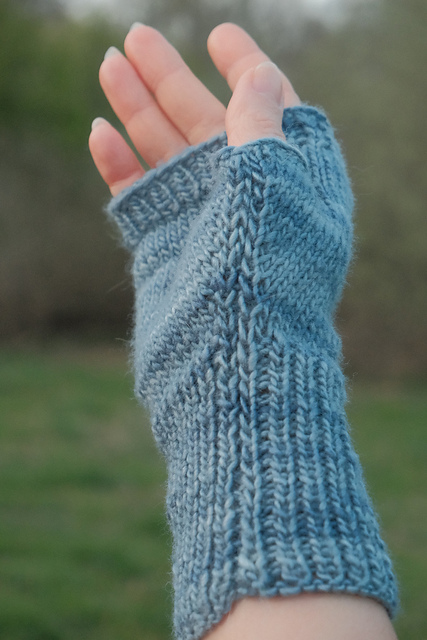
These fingerless mittens are worked flat and sewn together using mattress stitch. The ribbed cuffs and top keep everything snug, while the thumb opening is shaped with simple increases and a stretchy bind off. The result is a pair of cosy, comfortable mitts that are perfect for those in-between days when it’s not quite cold enough for full gloves, but you still want something on your hands!
Step-by-step video tutorial: https://youtu.be/bhq_5yhRhtQ?si=Mh-SUBHpLCFtJqQ9
Materials
- 4mm knitting needles
- Optionally3,5 mm for cuffs and top ribbing if you prefer a tighter fit
- MalabrigoSilky Merino, 40 g / ~120 m per pair. Any DK weight yarn suitable for 4 mm needles will work.
- Stitchmarkers
- Darningneedle
Gauge
10 cm x 10 cm in stockinette: 23 sts × 16 rows
Measurements
One size: 9 cm wide, 20 cm long
Gauge is not critical for this pattern, but it will affect the final size. If your gauge is looser, the mitts will be larger; if tighter, smaller.
Notes
Both mitts are identical, there is no left or right. The seam runs along the side of the hand. The thumb opening is created by increasing stitches on both sides over 8 RS rows, then binding them off before continuing to the top ribbing.
Needle size tip: You can use 3.5 mm needles for the cuffs (Rows 1–30) and the top ribbing section if you’d like a snugger fit there.
Edge stitches: Throughout the pattern, the last stitch of every row is slipped rather than worked. This creates a clean, neat edge that’s much easier to seam. Don’t skip this step!
Yarn tail tip: Leave a long tail when casting on – you’ll use it later to sew the edges.
Abbreviation and terminology (US)
| k | Knit |
| p | Purl |
| sl1k | slip 1 stitch knitwise, yarn held behind |
| sl1p | slip 1 stitch purlwise, yarn held in front |
|
M1L |
make 1 left leaning: lift the bar between stitches, place on left needle with left leg behind, knit through the back leg |
|
M1R |
make 1 right-leaning: lift the bar between stitches, place on left needle with left leg in front, knit through the front leg |
| RS | Right side |
| WS | Wrong side |
| pm | Place marker |
| sm | Slip marker |
| bo | Bind off |
CAST ON:
- Usingthe long tail cast on method on two needles held together, cast on 43
- Usingtwo needles gives a more elastic cast on edge, once done, remove the second needle
CUFF (ROWS 1 – 30):
The first row is worked slightly differently to set up the edge stitches.
- Row1 (RS — set-up row): K1, *k1, p1; rep from * to last 2 sts, k1,
- Row2 (WS): P1, *p1, k1; rep from * to last 2 sts, p1, sl1p (yarn in front). From Row 3 onwards, all rows follow this edge stitch pattern:
- RSrows: K1, *k1, p1; rep from * to last 2 sts, k1, sl1k (yarn behind).
- WSrows: P1, *p1, k1; rep from * to last 2 sts, p1, sl1p (yarn in front).
Continue in pattern until you have completed 30 rows total (your last row will be on the wrong side)
STOCKINETTE TRANSITION (ROWS 31 – 34):
Switch to plain stockinette stitch. Continue slipping the last stitch of every row as established.
- RS rows:K to last st,
- WSrows: P to last st,
Work 4 rows in stockinette (2 RS, 2 WS). You now have 34 rows total.
THUMB INCREASES (ROWS 35 –50):
Increases are made on RS rows only, 1 stitch added at each end using M1L at the beginning and M1R at the end. WS rows are worked plain (purl all, slip last stitch).
Optional: Place markers 2 sts in from each end to mark increase positions. Use additional markers to count how many increase stitches you’ve added on each side.
- RSincrease row: K2, sm, M1L, k to last 2 sts, M1R, sm, k1, (2 sts increased)
- WSrow: P to last st,
Repeat these 2 rows 8 times total (8 RS increase rows, 8 WS rows = 16 rows). You will have 8 extra stitches on each side, 16 thumb stitches total + the original 43 sts in the centre. Total: 59 sts.
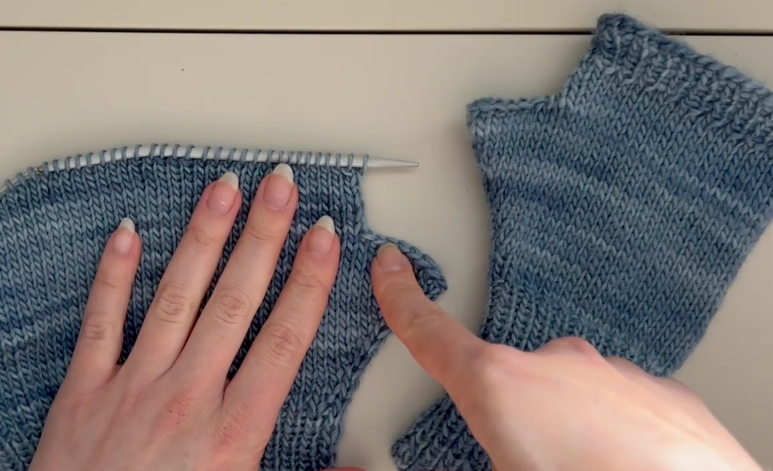
THUMB BIND OFF (ROWS 51 – 52)
The thumb stitches are bound off over two rows, 8 sts at the start of the RS row, then 8 sts at the start of the WS row. Use the stretchy bind off method.
Stretchy bind off method: K1, *k1, insert left needle into the front of the 2 sts on right needle and k2tog; rep from * until the required number of sts have been bound off.
- Row51 (RS): Bo 8 sts, k to last st, (removing any markers)
- Row52 (WS): Bo 8 sts, p to last st, (43 sts remain)
The bound-off sections on each side will form the thumb opening once the mitten is seamed.
PALM SECTION (ROWS 53 – 60)
Continue in stockinette, slipping the last stitch of every row as before.
- RS rows: K to lastst,
- WSrows: P to last st,
Work 8 rows total (4 RS, 4 WS). You now have 60 rows total.
TOP RIBBING (ROWS 61 – 68)
Work 8 rows of 1×1 ribbing, same as the cuff.
- RSrows: K1, *k1, p1; rep from * to last 2 sts, k1,
- WSrows: P1, *p1, k1; rep from * to last 2 sts, p1,
If you’d like a longer top cuff, simply add more rows before binding off.
FINAL BIND OFF (ROW 69)
Row69 (RS): Using the stretchy bind off, bind off all 43 Cut yarn and secure.
FINISHING
- Threadyour darning needle with the long cast-on
- Foldthe mitten so the cast-on edge meets Using mattress stitch, sew the bottom seam (below the thumb). Pull gently as you go! Don’t pull too tight or you’ll lose the stretch.
- Threada new length of yarn and sew the side seam from the top bind-off edge down to the thumb opening, stopping where the thumb stitches begin.
- Weavein all Repeat for the second mitten.
If you’re new to mattress stitch, there are plenty of great tutorial videos on YouTube -> search “mattress stitch knitting” for a visual guide.
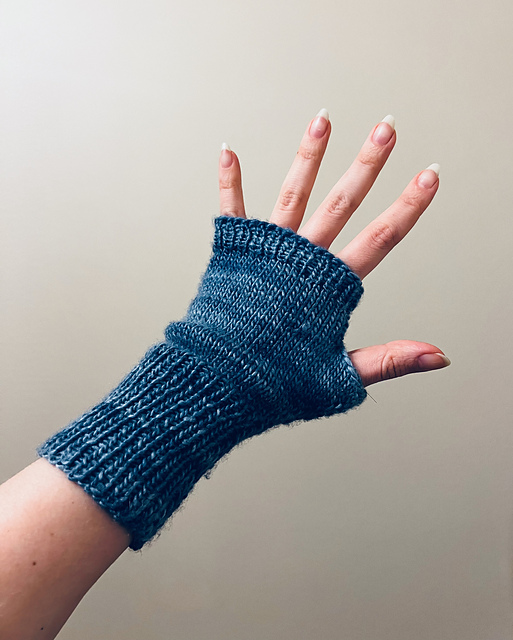
YOU’RE DONE!
Congratulations! You just made a pair of Early Spring Mittens!
Now! I’d love to see it! Please share them with me! Seeing your finished mittens will make my day! If you love this pattern, it would mean so much to me if you could share your makes and leave a ki nd review.
Thank you!